


Formwork is the temporary (or permanent) “mould” that shapes wet concrete until it can hold itself up. But on site, formwork isn’t just about shape. It’s a load-carrying system that has to resist fresh concrete pressure, vibration, workers, gear, wind and accidental knocks — all while staying straight, plumb and tight.
If you’re a builder or specifier, the fastest way to avoid rework, delays and defects is to understand two things:
• what the formwork is doing during placement (load paths and stability)
• what must be verified before the first chute or pump line starts moving concrete
This guide explains how formwork works in plain terms, then gives you a builder-ready checklist and the red flags that should pause a pour.
What formwork is really doing during a pour
When concrete is fresh, it can behave more like a heavy fluid than a solid. That means:
• it pushes sideways on wall forms (lateral pressure)
• it pushes down on soffits and decks (vertical load)
• vibration can temporarily increase the “fluid-like” behaviour
• faster pour rates can increase pressure before the mix starts stiffening
So the formwork system has to do four jobs at once:
1) Contain the concrete
The face of the form (sheeting, panels, liners) must stop grout loss and hold shape. If the form leaks, you get:
• honeycombing and rock pockets
• weak edges and blowouts starting at joints
• messy clean-up and patching
2) Transfer loads safely to the ground or supporting structure
Fresh concrete load travels through:
• the form face → studs/walers/frames → ties/bracing/props → foundations/footings/slab or falsework
If any link in that chain is under-designed, damaged, poorly fixed or sitting on soft ground, movement happens. And movement is what creates:
• bulging walls
• misaligned corners
• out-of-tolerance set-out
• cracking, cold joints and surface defects
3) Keep alignment, line and level
Formwork doesn’t just need to be “strong enough.” It needs to be stiff enough to stay where you set it:
• plumb walls
• straight runs
• consistent thickness and cover
• correct openings, penetrations and rebates
4) Provide a safe work area
Formwork work often involves:
• heights and edges
• penetrations and voids
• manual handling and repetitive fastening
• crane lifts, braces and props under load
For Australian WHS guidance on managing formwork risk, a good reference is Safe Work Australia’s Guide to formwork.
The big decision: temporary formwork vs permanent formwork
Most people think “formwork” always gets stripped off. That’s true for traditional timber/ply, many modular wall systems, and conventional suspended slab formwork.
But permanent formwork (stay-in-place systems) changes the workflow:
• install panels
• install reinforcement
• pour concrete
• no stripping cycle for wall forms
That “no strip” reality matters because stripping and re-erecting is where time and labour blow out — and where damage and tolerance issues often creep in.
Why this matters commercially: speed, labour and total installed cost
For specifiers and builders, the conversation shouldn’t stop at “panel price.” Installed cost is driven by:
• labour hours
• bracing demand
• steel demand (in some wall systems)
• logistics (freight, storage, handling)
• program impacts (waiting on stripping, re-setup, patching)
That’s why modern permanent formwork systems are often positioned around site outcomes such as:
• up to 70% faster install compared with slower, labour-heavy alternatives
• up to 30% lower total installed cost (labour + bracing + steel + freight)
• less labour and less bracing due to higher system stiffness/strength
• lay-flat logistics efficiency — up to 5× more per load and easier storage
• stronger wall form behaviour — often described as up to 2× strength versus blockwork performance in practical terms
• water resistance — sometimes enabling up to ~70% less waterproofing effort in suitable applications
Those numbers only mean something if they show up as fewer steps, fewer hands, fewer props, fewer deliveries, and less rework.
Comparisons that matter
Blockwork: slow, labour-heavy, sequencing headaches
Blockwork can be reliable, but it’s often:
• slow (block-by-block)
• labour-intensive
• dependent on skilled availability
• prone to variability in straightness and finish
• often needs additional waterproofing steps in below-ground or wet exposures
From a program perspective, blockwork is a classic “death by a thousand cuts” trade — it chips away at time and budget through labour hours and sequencing.
Traditional formwork: flexible but multi-step and labour-heavy
Traditional timber/ply formwork is adaptable, but on many projects it brings:
• more steps (erect, brace, check, pour, strip, patch, clean, reset)
• heavier bracing reliance if the system isn’t engineered or is improvised
• more waste and more site clutter
• variable finishes depending on workmanship and reuse condition
Non-lay-flat systems: bulky logistics and site congestion
Some panel systems solve certain problems but create others:
• bulky transport profiles that increase freight runs
• storage headaches (especially on tight metro sites)
• more handling and congestion, which increases labour and risk
This is where a lay-flat system can be a genuine differentiator: if you can move up to 5× more per load and store more per square metre, you’re not just saving freight — you’re reducing handling steps and site clutter, which flows directly into installed cost.
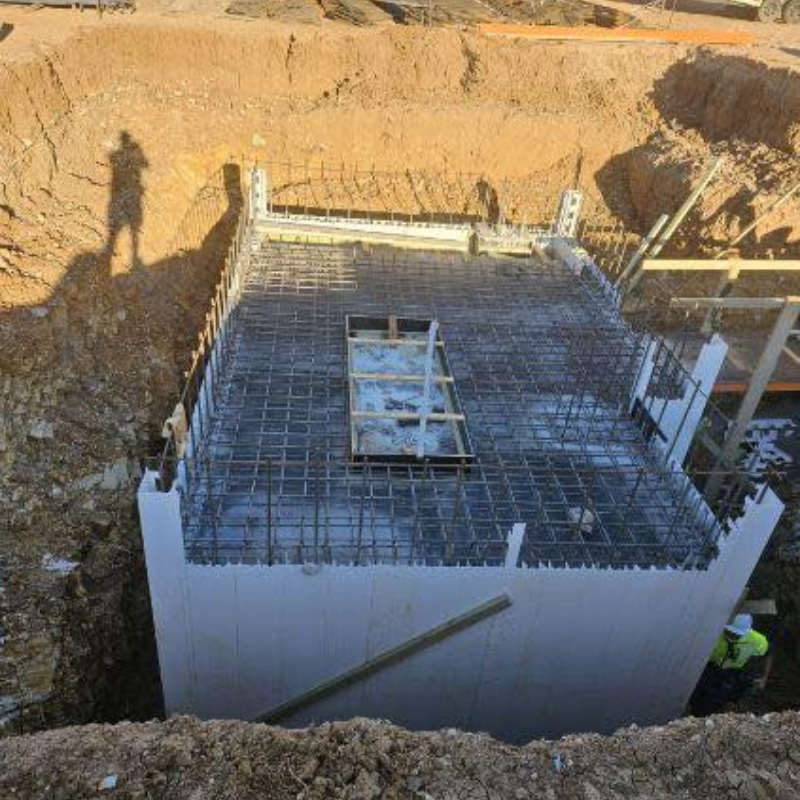
How does permanent formwork actually work on site?
Here’s the practical “builder’s sequence” for a permanent wall formwork system:
1) Set-out and substrate prep
- confirm line, level and offsets
• check slab edge or footing dimensions
• confirm starter bars/dowels locations and cover
2) Panel installation
Panels are fixed in place to form the wall geometry. Key success factors:
• accurate set-out at the base
• tight joints (to prevent grout loss)
• consistent fastening patterns
• correct corners and returns
The goal is a straight, stable wall line that won’t move during placement.
3) Reinforcement installation
Reo is installed within the formwork system:
• vertical bars, laps and hooks per drawings
• horizontals/ties as required
• correct spacers/chairs to maintain cover
• openings, block-outs and embeds fixed solidly
4) Bracing and alignment
Even with a stronger system, bracing and alignment are still about:
• preventing movement during placement
• keeping the wall plumb
• controlling vibration effects and accidental knocks
A stronger system can mean less reliance on heavy bracing, which is one of the biggest levers for faster install and lower installed cost.
5) Pre-pour verification, then placement
This is the make-or-break moment. You want:
• a stable, plumb, tight form
• clean out where required
• safe access/edge protection
• a clear pour plan (sequence, lift heights, vibration approach)
6) Pour, monitor, and respond
During placement, supervision is active:
• watch joints and corners
• watch braces and fixings
• control pour rate/lift heights
• manage vibration to avoid “over-liquefying” sections
• keep exclusion zones clear
The pre-pour checklist builders actually use
Use this as a practical site workflow. If you’re specifying systems, this is also a good structure for what you expect to see documented and verified.
Foundations and bearing
• base is true and clean (no debris under plates/rails)
• bearing points are on a solid substrate (no soft fill, no rocking)
• fixings are the correct type and spacing
• kickers/returns are locked in
Geometry and tolerances
• line and level confirmed at multiple points along the run
• plumb verified on walls (not just at one end)
• corners are square and locked
• openings are the correct size and braced
• wall thickness is consistent and matches drawings
Joints, seals and grout-loss control
• panel joints are tight
• corners and penetrations are sealed as required
• no visible pathways for grout loss
• interfaces at slab/footing are controlled
Bracing, ties and stability
• braces/props are correctly fixed top and bottom
• bracing isn’t relying on “temporary” nails or friction
• tie locations (if used) are correct and undamaged
• adjustment points are locked off (no loose turnbuckles)
• there’s no visible bowing before the pour starts
Reinforcement and embeds
• bar sizes and spacing match drawings
• laps and ties installed as specified
• cover spacers are in place and stable
• cast-ins, sleeves, puddle flanges, and block-outs are fixed and won’t float or move
• penetrations are protected to prevent grout loss and misalignment
Safety and pour readiness
• edge protection in place where needed
• penetrations covered or barricaded
• exclusion zones set (especially around bracing and drop zones)
• access is clear for the pump line and workers
• vibration plan is understood (who, where, how much)
• comms plan is clear (stop signals, escalation)
Questions builders ask before a pour
Does formwork need to be “engineered” every time?
Not always in the same way, but the risk profile matters. Taller walls, unusual geometry, higher pour rates, complex openings, suspended slabs, or windy/exposed sites all lift the stakes. Treat formwork as temporary works: it needs competent verification and a clear load/stability plan.
What’s the fastest way to reduce defects?
Stop grout loss, stop movement, and control pour rate. Most visible defects trace back to one of those three.
“Stop the pour” triggers: what to watch in real time
Concrete placement is not the time to hope things hold. If you see any of the below, pause and reassess:
• visible bulging or new bowing in wall faces
• grout leaking at joints or corners (especially if increasing)
• braces settling, slipping, or “popping” fixings
• sudden movement at openings, corners, returns
• cracking sounds, tie distress, or fastener pull-out signs
• pump surge causing repeated shock loads
• vibration causing forms to “walk” out of line
A short pause early is cheaper than a blowout, rebuild, program delay, and remediation.
Why stronger systems reduce bracing, labour, and installed cost
Bracing is more than a safety line item. It’s a cost multiplier:
• more braces = more install labour
• more braces = more site congestion and handling
• more braces = more fixings and more opportunities for errors
• more braces = slower pour monitoring and slower stripping/reset cycles (for temporary systems)
So when a system is materially stiffer/stronger in practice — commonly framed as “up to 2× strength” compared with labour-heavy alternatives like blockwork — it can translate into:
• less reliance on extensive bracing
• reduced movement during placement
• straighter finishes and fewer tolerance issues
• faster install (numbers like “up to 70% faster” only matter if steps are actually removed)
• lower total installed cost (figures like “up to 30% lower” come from labour + bracing + steel + freight, not just product cost)
That’s also why, when you’re specifying, it’s smart to look for systems that behave predictably under pour pressure and vibration — not just systems that are easy to quote.
If you’re reviewing product categories, it helps to understand what falls under modern concrete formwork components — because the component design often determines how much bracing, handling and rework you’ll wear on site.
Freight and storage: the hidden driver of total cost
Freight and storage are easy to underestimate because they don’t always sit in one budget line. But on real projects, they show up as:
• extra deliveries
• extra handling steps
• congestion and double-handling on tight sites
• remote logistics complexity (regional Australia, basements, constrained access)
Lay-flat designs change the equation:
• up to 5× more per load can reduce deliveries
• denser storage per square metre reduces site clutter
• faster picking and handling reduces labour hours
• simpler logistics can make remote and regional projects more predictable
This is one of those advantages that stacks with everything else: fewer loads → fewer lifts/handling steps → less labour → lower installed cost.
For specifiers comparing systems, that’s why it’s worth separating “bulky but familiar” from genuinely reliable formwork components designed for efficient transport, storage and installation.
Water resistance and waterproofing effort: where the time goes below ground
Below-grade walls (basements, retaining walls, lift pits) punish weak detailing. Common pain points:
• inconsistent substrates for membranes
• voids and honeycombing from grout loss
• cracks from movement or poor consolidation
• extra patching before waterproofing can even start
A highly water-resistant permanent formwork approach can reduce the amount of waterproofing work required in some designs — often framed commercially as “up to ~70% less waterproofing required” depending on the system and detailing. The practical win is:
• fewer remedial steps
• fewer trades tripping over each other
• lower risk of leaks and callbacks
Questions specifiers ask about waterproofing
Does “water resistant” mean “waterproof”?
Not automatically. It means the system can reduce pathways for ingress and reduce prep work, but you still need correct detailing at joints, penetrations, and terminations. Treat it as risk reduction and efficiency, not permission to ignore design requirements.
Waste reduction: efficiency you can see on the slab
On many sites, waste is time:
• cutting and re-cutting
• disposal runs
• cleaning and patching
• sorting damaged materials
Systems designed for simpler installation and fewer steps typically create:
• less offcut waste
• reusable offcuts in some cases
• cleaner work zones
• fewer “fix it later” defects that become expensive
Waste reduction isn’t just sustainability — it’s fewer labour hours and fewer delays, which ties straight back to installed cost.
Make it real: where these checks and advantages matter most
Here are common use cases where formwork performance, speed, logistics and water resistance become decisive:
Retaining walls
• movement during placement shows up as bulging and ugly alignment
• water management and waterproofing efforts can dominate cost
• access constraints often make logistics (lay-flat, storage) a real advantage
Basement walls and below-ground structures
• water resistance and detailing reduce leak risk
• consistent straightness improves waterproofing outcomes
• fewer steps help programs where trades stack up quickly
Residential builds (especially tight sites)
• faster install reduces program pressure
• fewer deliveries and lay-flat storage reduce congestion
• builder-friendly install reduces dependency on specialist crews
Load-bearing walls and structural cores
• strength/stiffness reduces reliance on heavy bracing
• better stability helps hold tolerances
• reduced rework protects downstream trades
Remote and regional projects
• freight and storage efficiency can be the difference between “works” and “bleeds money”
• fewer loads and less handling reduce labour pressure where crews are limited
• predictable install reduces schedule risk
When you want to connect those outcomes to a system choice, it helps to think in terms of formwork solutions for builders that reduce steps, labour and logistics — not just “what’s the cheapest panel.”
Final pre-pour quick workflow (the 60-second mental model)
Before the first concrete arrives, you want confidence in four words:
• bearing
• bracing
• boundaries
• buildability
Bearing: stable base and fixings
Bracing: locked alignment and resistance to movement
Boundaries: sealed joints/penetrations + safe edges/exclusion zones
Buildability: reinforcement/embeds ready, pour plan understood, comms clear
FAQs
How does formwork “hold” concrete if concrete is so heavy?
It works by transferring the load through a chain: form face → frames/walers → ties/bracing/props → foundations/falsework. The system must be strong and stiff enough to resist fresh concrete pressure and vibration without moving.
What should builders check immediately before a pour?
At minimum:
• stable bearing and fixings
• line/level/plumb and corners locked
• bracing/props fixed and locked off
• joints sealed to prevent grout loss
• reinforcement, cover, embeds and penetrations secured
• safety controls in place (edges, voids, exclusion zones)
What causes formwork blowouts?
Most blowouts come from a combination of:
• weak points at joints/corners/openings
• inadequate bracing or fixings
• high pour rates/lift heights, increasing pressure
• vibration makes concrete behave more fluid-like
• poor bearing (settlement or sliding at the base)
Is blockwork still a good option?
It can be, but it’s often slower and more labour-intensive, with sequencing impacts. Many projects now compare blockwork against permanent formwork on installed cost, speed (often quoted up to 70% faster) and program certainty — especially where labour is tight.
Do you always need lots of bracing?
Bracing needs depend on wall height, geometry, pour method and system stiffness. A stronger system can reduce reliance on extensive bracing, which can cut labour and speed up installation — one of the main drivers behind “up to 30% lower installed cost” claims.
Why does lay-flat transport matter so much?
Because freight is only part of it. Higher load density (often positioned as up to 5× more per load) usually means fewer deliveries, less handling, less site congestion and fewer labour hours — all of which reduce total installed cost.
Does permanent formwork remove the need for waterproofing?
Not automatically. But a highly water-resistant system can reduce prep and patching, and in some designs can reduce waterproofing effort significantly (often positioned as up to ~70% less). Detailing still matters at joints, terminations and penetrations.
What’s the simplest way to avoid defects?
Prevent movement, prevent grout loss, and control placement rate and vibration. Most visible defects trace back to those fundamentals.